Je eerste Yii-applicatie
Om de eerste ervaring met Yii op te doen, beschrijven we in het onderstaande
deel hoe we onze eerste Yii-applicatie maken. We zullen yiic (commandline-tool)
gebruiken om een nieuwe Yii-applicatie te maken, en Gii (krachtige web-based
codegenerator) gebruiken om voor bepaalde taken automatisch code te genereren.
Voor het gemak nemen we aan dat YiiRoot de map is waar Yii is geïnstalleerd
en dat WebRoot de document-root van onze webserver is.
Gebruik de command-line om yiic uit te voeren op de volgende manier:
% YiiRoot/framework/yiic webapp WebRoot/testdrive
Note: Wanneer
yiicuitgevoerd word op Mac OS, Linux of Unix, moet je mogelijk de rechten van hetyiic-bestand aanpassen zodat deze uitvoerbaar wordt. Als een alternatief kun je de tool ook op de volgende manier uitvoeren:% cd WebRoot % php YiiRoot/framework/yiic.php webapp testdrive
Hiermee word een raamwerk gecreëerd voor een Yii-applicatie onder de map
WebRoot/testdrive. De applicatie heeft een mappenstructuur die vereist is
voor de meeste Yii-applicaties.
Zonder een enkele regel code te schrijven kunnen we onze eerste Yii-applicatie testen, door de volgende URL te bezoeken in een webbrowser:
http://hostnaam/testdrive/index.php
Zoals we kunnen zien heeft de applicatie view pagina's: de hoofdpagina, de 'over' pagina, de contactpagina en een login-pagina. De contactpagina geeft een formulier weer dat gebruikt kan worden om vragen te stellen aan de webmaster, en de login-pagina geeft gebruikers de mogelijkheid om geverifiëerd te worden voordat ze bepaalde beschermde content kunnen bereiken. Zie de volgende screenshots voor meer details.
Hoofdpagina

Contactpagina

Contactpagina met invoerfouten

Contactpagina met succes

Loginpagina

The following diagram shows the directory structure of our application. Please see Conventions for detailed explanation about this structure.
testdrive/
   index.php                 Web application entry script file
   index-test.php            entry script file for the functional tests
   assets/                   containing published resource files
   css/                      containing CSS files
   images/                   containing image files
   themes/                   containing application themes
   protected/                containing protected application files
      yiic                   yiic command line script for Unix/Linux
      yiic.bat               yiic command line script for Windows
      yiic.php               yiic command line PHP script
      commands/              containing customized 'yiic' commands
         shell/              containing customized 'yiic shell' commands
      components/            containing reusable user components
         Controller.php      the base class for all controller classes
         UserIdentity.php    the 'UserIdentity' class used for authentication
      config/                containing configuration files
         console.php         the console application configuration
         main.php            the Web application configuration
         test.php            the configuration for the functional tests
      controllers/           containing controller class files
         SiteController.php  the default controller class
      data/                  containing the sample database
         schema.mysql.sql    the DB schema for the sample MySQL database
         schema.sqlite.sql   the DB schema for the sample SQLite database
         testdrive.db        the sample SQLite database file
      extensions/            containing third-party extensions
      messages/              containing translated messages
      models/                containing model class files
         LoginForm.php       the form model for 'login' action
         ContactForm.php     the form model for 'contact' action
      runtime/               containing temporarily generated files
      tests/                 containing test scripts
      views/                 containing controller view and layout files
         layouts/            containing layout view files
            main.php         the base layout shared by all pages
            column1.php      the layout for pages using a single column
            column2.php      the layout for pages using two columns
         site/               containing view files for the 'site' controller
            pages/           containing "static" pages
               about.php     the view for the "about" page
            contact.php      the view for 'contact' action
            error.php        the view for 'error' action (displaying external errors)
            index.php        the view for 'index' action
            login.php        the view for 'login' action
Connecting to Database
Most Web applications are backed by databases. Our test-drive application
is not an exception. To use a database, we need to tell the
application how to connect to it. This is done in the application
configuration file WebRoot/testdrive/protected/config/main.php, highlighted as follows,
return array(
    ......
    'components'=>array(
        ......
        'db'=>array(
            'connectionString'=>'sqlite:protected/data/testdrive.db',
        ),
    ),
    ......
);
The above code instructs Yii that the application should connect to the SQLite database
WebRoot/testdrive/protected/data/testdrive.db when needed. Note that the SQLite database
is already included in the skeleton application that we just generated. The database
contains only a single table named tbl_user:
CREATE TABLE tbl_user (
    id INTEGER NOT NULL PRIMARY KEY AUTOINCREMENT,
    username VARCHAR(128) NOT NULL,
    password VARCHAR(128) NOT NULL,
    email VARCHAR(128) NOT NULL
);
If you want to try a MySQL database instead, you may use the included MySQL
schema file WebRoot/testdrive/protected/data/schema.mysql.sql to create the database.
Note: To use Yii's database feature, we need to enable PHP PDO extension and the driver-specific PDO extension. For the test-drive application, we need to turn on both the
php_pdoandphp_pdo_sqliteextensions.
Implementing CRUD Operations
Now is the fun part. We would like to implement the CRUD (create, read,
update and delete) operations for the tbl_user table we just created. This is
also commonly needed in practical applications. Instead of taking the trouble
to write the actual code, we will use Gii -- a powerful Web-based code generator.
Info: Gii has been available since version 1.1.2. Before that, we can use the aforementioned
yiictool to accomplish the same goal. For more details, please refer to Implementing CRUD Operations with yiic shell.
Configuring Gii
In order to use Gii, we first need to edit the file WebRoot/testdrive/protected/config/main.php, which is known as the application configuration file:
return array(
    ......
    'import'=>array(
        'application.models.*',
        'application.components.*',
    ),

    'modules'=>array(
        'gii'=>array(
            'class'=>'system.gii.GiiModule',
            'password'=>'pick up a password here',
        ),
    ),
);
Then, visit the URL http://hostname/testdrive/index.php?r=gii. We will be prompted for a password, which should be the one that we just entered in the above application configuration.
Generating User Model
After login, click on the link Model Generator. This will bring us to the following model generation page,
Model Generator
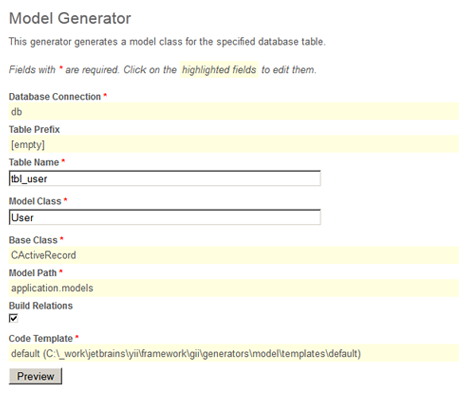
In the Table Name field, enter tbl_user. In the Model Class field, enter User. Then press the Preview button. This will show us the new code file to be generated. Now press the Generate button. A new file named User.php will be generated under protected/models. As we will describe later in this guide, this User model class allows us to talk to the underlying database tbl_user table in an object-oriented fashion.
Generating CRUD Code
After creating the model class file, we will generate the code that implements the CRUD operations about the user data. We choose the Crud Generator in Gii, shown as follows,
CRUD Generator

In the Model Class field, enter User. In the Controller ID field, enter user (in lower case). Now press the Preview button followed by the Generate button. We are done with the CRUD code generation.
Accessing CRUD Pages
Let's enjoy our work by browsing the following URL:
http://hostname/testdrive/index.php?r=user
This will display a list of user entries in the tbl_user table.
Click the Create User button on the page. We will be brought to the login
page if we have not logged in before. After logged in, we see
an input form that allows us to add a new user entry. Complete the form and
click on the Create button. If there is any input error, a nice error
prompt will show up which prevents us from saving the input. Back to the
user list page, we should see the newly added user appearing in the list.
Repeat the above steps to add more users. Notice that user list page will automatically paginate the user entries if there are too many to be displayed in one page.
If we login as an administrator using admin/admin, we can view the user
admin page with the following URL:
http://hostname/testdrive/index.php?r=user/admin
This will show us the user entries in a nice tabular format. We can click on the table header cells to sort the corresponding columns. We can click on the buttons on each row of data to view, update or delete the corresponding row of data. We can browse different pages. We can also filter and search to look for the data we are interested in.
All these nice features come without requiring us to write a single line of code!
User admin page

Create new user page
